

How to Soften Stiff T-Shirts: Safe, Step-by-Step Methods
The fastest safe ways to soften stiff t shirts are a distilled white vinegar rinse, a salt/brine soak, a baking soda wash, fabric softener with wool dryer balls, and mechanical agitation. Each method hits differently depending on what you’re working with.
- Vinegar rinse: Gentle, removes factory sizing and mineral buildup. Best for blends, lightly stiff tees, and screen-printed areas.
- Salt/brine soak: The heavy hitter. Best for very stiff 100% cotton and ring-spun cotton tees where you want a permanent, broken-in feel.
- Baking soda wash: Tackles odor and detergent residue alongside stiffness. Good first move when the shirt smells as stiff as it feels.
- Fabric softener + wool dryer balls: Quickest machine method. Temporary softness, but fast and low-effort.
- Mechanical agitation (dryer balls, pumice, sandpaper): For a vintage, lived-in texture. Permanent but carries real risk for printed areas.
If you own an Elitebloodlines heavyweight tee built from thick combed ring-spun cotton, start with the vinegar rinse or dryer ball tumble. Save the salt soak for unprinted, older pieces. Aggressive abrasion? Only if you’re intentionally distressing the look.
Pro Tip: Before any treatment, check the care label and do a quick colorfastness test on an interior seam. A 15-minute spot test with your chosen solution saves you from a ruined print.
Key Takeaways
The most effective way to soften stiff t shirts is to match the method to the fabric: salt soaks for heavy unprinted cotton, vinegar rinses for printed tees, and dryer ball tumbling for ongoing maintenance.
| Point | Details |
|---|---|
| Salt soak for heavy cotton | Dissolve 1/2–1 cup salt per quart of warm water; soak 12–72 hours for a lasting, structural softness change. |
| Vinegar rinse for printed tees | Add 1/2–1 cup distilled white vinegar to the rinse cycle; safe for most prints and removes factory sizing. |
| Dryer balls for maintenance | Tumble with 2–4 wool dryer balls on low heat regularly to build cumulative softness without chemical buildup. |
| Protect screen prints | Always turn shirts inside out, use cold or warm water, and avoid abrasion or dryer sheets near printed areas. |
| Elitebloodlines vintage line | Pre-softened, vintage-washed heavyweight tees that arrive with a broken-in feel, no DIY required. |
Table of Contents
- What supplies do you need before you start softening?
- How does a vinegar rinse soften stiff t shirts?
- How does a salt soak break in very stiff 100% cotton?
- Does baking soda actually soften cotton shirts?
- Can fabric softener and dryer balls give you fast results?
- When does mechanical distressing make sense for very stiff tees?
- What dryer settings actually soften fabric without damaging it?
- How do you soften a shirt without damaging the screen print?
- How long does softness last after treatment?
- If you own an Elitebloodlines heavyweight tee, start here
- Tees that arrive soft: the Elitebloodlines alternative
- Sources
What supplies do you need before you start softening?
Gather everything before you touch the shirt. The wrong product or water temperature can shrink a tee or crack a screen print before you get any softness out of it.
Your supply checklist:
- Distilled white vinegar (not apple cider, not colored vinegar)
- Table salt or kosher salt
- Baking soda (and washing soda only for heavy buildup, used cautiously)
- Liquid fabric softener, optional
- Wool dryer balls or clean tennis balls as a budget swap
- Mild detergent
- A bucket or basin large enough to fully submerge the shirt
- A thermometer or a clear sense of water temperature (warm = 90–110°F; hot = above 120°F)
- Pumice stone or fine-grit sandpaper, only for heavy-duty mechanical work
Reading the care label: Look for the fiber content first. Blends with polyester or modal need gentler treatment and cooler water. If the label says “dry clean only” or flags a specialty finish, skip the DIY soaks entirely. A heat-transfer or screen-print notice means you treat that area with extra care.
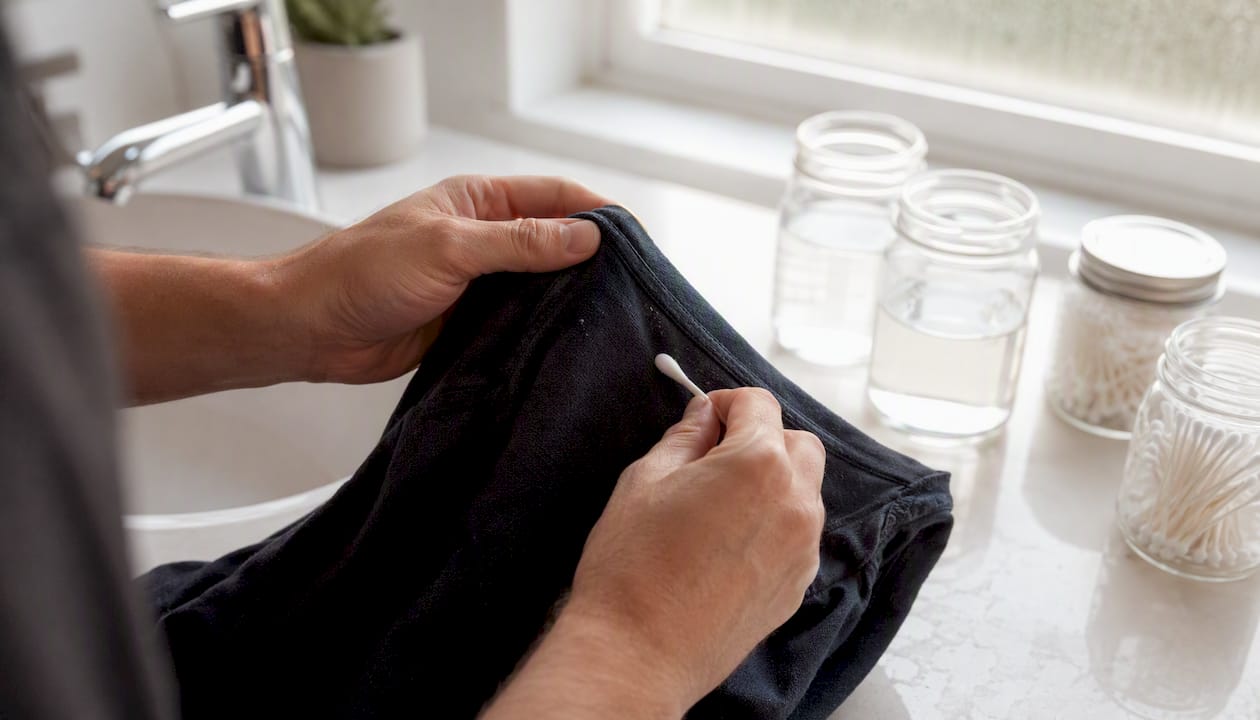
Colorfastness test: Dampen a cotton swab with your chosen solution (vinegar, water, or diluted detergent). Dab it on an interior hem or inside seam. Wait 15 minutes. If color transfers to the swab, the dye is not stable and you need a gentler approach or a cold-water-only method.
Pro Tip: Distilled white vinegar is the only vinegar you should use on fabric. Apple cider vinegar contains tannins that can stain light-colored cotton permanently.
How does a vinegar rinse soften stiff t shirts?
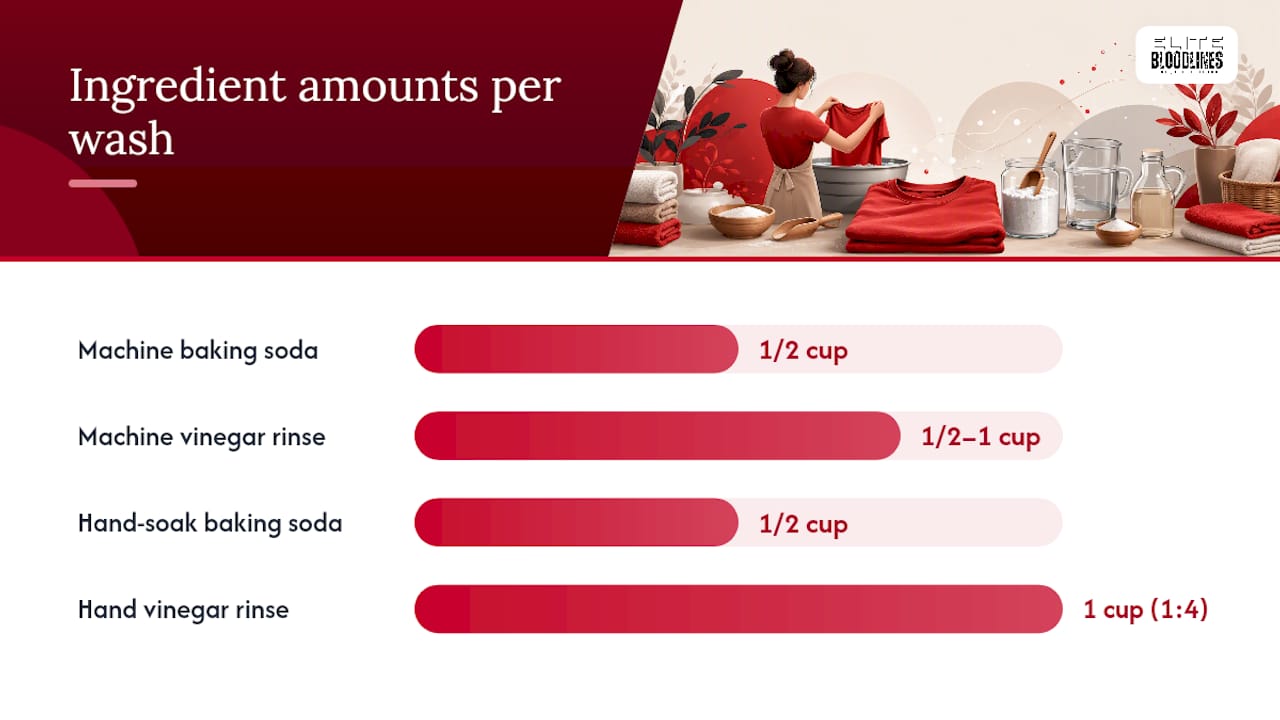
White distilled vinegar dissolves mineral deposits and factory sizing left behind from manufacturing and hard water, and it’s safe as a rinse additive with minimal risk of lingering odor after washing. Add 1/2 to 1 cup of distilled white vinegar to the rinse cycle, or soak the shirt in a 1:4 vinegar-to-water solution for 30–60 minutes, then wash and rinse thoroughly.
Step-by-step (washing machine method):
- Set your washer to a cold or warm cycle (never hot for printed tees).
- Add your regular mild detergent for the wash cycle.
- Pour 1/2 to 1 cup of distilled white vinegar into the fabric softener drawer or directly into the drum at the start of the rinse cycle.
- Run the full rinse cycle.
- Remove the shirt promptly and hang or tumble dry on low.
Hand-soak alternative:
- Fill a bucket with cool or lukewarm water.
- Add 1 cup of distilled white vinegar per 4 cups of water.
- Submerge the shirt fully and soak for 30–60 minutes, flipping once halfway through.
- Wring gently, then run through a normal wash cycle to remove any residual vinegar.
- Tumble dry on low or air dry.
Pros: Removes mineral and sizing residue, low damage risk, no lasting vinegar smell after washing. Cons: Limited effect on heavily starched or very thick cotton. Do not combine vinegar with bleach at any point, and skip this method on garments with specialty finishes or delicate embellishments.
Pro Tip: Pour vinegar into the fabric softener drawer rather than directly onto the shirt. It disperses more evenly through the rinse water and avoids concentrated contact with printed areas.
How does a salt soak break in very stiff 100% cotton?
Salt works mechanically, loosening and lightly abrading the outer fiber layers while dissolving factory sizing. Dissolve an appropriate amount of table or kosher salt per quart of warm water, fully submerge the shirt, and soak for several hours to a few days depending on fabric stiffness. Then wash and rinse thoroughly to remove all salt residue.
Step-by-step brine soak:
- Fill a bucket or basin with warm water (around 100–110°F).
- Dissolve 1/2 to 1 cup of table or kosher salt per quart of water. Stir until fully dissolved.
- Submerge the shirt completely. Press it down so no dry fabric remains above the waterline.
- Soak according to stiffness level (see timing guide below), flipping and gently agitating every 8–12 hours.
- Remove, wring gently, and launder immediately in a normal wash cycle with mild detergent.
- Tumble dry on low or hang to dry.
Soak timing by stiffness:
- Light stiffness: 12–24 hours
- Medium stiffness: 24–48 hours
- Heavy stiffness / thick construction: 48–72 hours
Salt can slightly affect dyes over multiple long soaks, so always run your colorfastness test first. Avoid this method on delicate prints, thin blends, or heat-transfer designs where extended moisture exposure risks adhesive failure.
Pro Tip: After a salt soak, follow with a vinegar rinse cycle to clear any remaining mineral or starch deposits. The two methods together produce noticeably better results than either one alone.
Does baking soda actually soften cotton shirts?
Yes, and it does more than just soften. A two-step baking soda wash followed by a vinegar rinse removes residue, deodorizes, and noticeably softens cotton and blends. Add 1/2 cup baking soda to the wash cycle alongside your detergent, then follow with 1/2 to 1 cup of white vinegar in the rinse. Run them as separate cycles to avoid a foaming reaction.
Step-by-step (machine wash):
- Load the shirt into the washer on a warm or cold setting.
- Add your usual mild detergent plus 1/2 cup of baking soda directly to the drum.
- Run the full wash cycle.
- When the rinse cycle begins, add 1/2 to 1 cup of distilled white vinegar to the fabric softener drawer.
- Complete the rinse cycle, then remove and dry on low heat.
Hand-wash version:
- Fill a basin with warm water and dissolve 1/2 cup baking soda.
- Soak the shirt for 30–60 minutes, agitating occasionally.
- Drain, rinse thoroughly with clean water.
- Do a final rinse with a diluted vinegar solution (1 cup vinegar to 4 cups water).
- Wring gently and air dry or tumble on low.
Washing soda is stronger than baking soda and speeds results on very heavy buildup, but it carries a higher risk of color shift. Use it only when baking soda alone hasn’t moved the needle after two attempts.
Pros: Deodorizes, helps detergent penetrate better, gentle on most fabrics. Cons: Washing soda can affect color if misused; baking soda alone has modest softening power on very thick cotton.
Pro Tip: If your shirt smells musty or like old detergent, baking soda is the right first move. Stiffness tied to residue buildup responds faster to this method than to vinegar alone.
Can fabric softener and dryer balls give you fast results?
Absolutely. This is the quickest machine-based method to soften heavy cotton tees. Tumble-drying with wool dryer balls is a fast, low-risk mechanical approach that fluffs fibers and reduces drying time. Pair it with liquid fabric softener on the rinse cycle for immediate, noticeable softness.
Step-by-step:
- Wash the shirt as normal with mild detergent.
- During the rinse cycle, add liquid fabric softener to the designated drawer (follow label dosage, typically 1–2 tablespoons for a small load).
- Transfer the damp shirt to the dryer.
- Add 2–4 wool dryer balls (or 2–3 clean tennis balls for a budget option).
- Set the dryer to low or medium heat.
- Remove the shirt while still slightly damp. Hang to finish air drying.
Fabric softeners coat fibers with a lubricating film for immediate softness but can build up over time and reduce absorbency. They can also affect print adhesives on screen-printed tees if used heavily. Dryer balls provide mechanical fluffing without any chemical buildup, making them the smarter long-term tool.
Pro Tip: Use fabric softener sparingly and rotate with a vinegar rinse every few washes. This keeps softness consistent without the waxy buildup that eventually makes fabric feel heavy and dull.
When does mechanical distressing make sense for very stiff tees?
Only when you want a permanent, vintage texture and you’re willing to accept real risk. Use a pumice stone, fine-grit sandpaper, or a scouring pad sparingly on non-printed, high-wear areas to break fibers and create a lived-in drape. This is not reversible.
Step-by-step:
- Lay the shirt flat on a hard surface.
- Identify non-printed zones: collar edges, side seams, hem, and underarm areas.
- Do a test patch on an interior seam first. Rub lightly 10–15 times and check for fraying or thinning.
- If the test patch holds, work the abrasive tool in short, controlled strokes on the target area.
- Check frequently. Stop before you see thinning or pilling.
- Launder the shirt immediately after to remove loose fibers.
Mechanical abrasion gives a permanent vintage texture but carries a high risk of holes and print damage. Thin fabrics and any printed zone are especially vulnerable. Never use abrasive tools near screen prints, heat transfers, or embroidered areas.
Pro Tip: Run a salt soak before mechanical distressing. Pre-softened fibers respond to lighter abrasion, which means less vigorous rubbing and a lower chance of punching through the fabric.
What dryer settings actually soften fabric without damaging it?
Mechanical agitation from tumbling fluffs cotton fibers and breaks up stiffness without chemicals. The key is heat control and timing.
Best practices for dryer softening:
- Use low or medium heat for cotton tees. High heat accelerates shrinkage and stresses screen prints.
- Add 2–4 wool dryer balls per load. They separate fibers, increase airflow, and cut drying time.
- For a no-heat option, use the air-fluff setting with dryer balls. It takes longer but carries zero shrinkage risk.
- Load size matters: don’t overload. A packed dryer reduces agitation and defeats the purpose.
- Remove the shirt while slightly damp, then hang to finish. Over-drying makes cotton brittle and can set creases.
- Shake the garment before loading and again when you pull it out to encourage loft.
Dryer balls mechanically separate and fluff fibers without chemical coatings, making them the best recurring maintenance tool for softness and energy savings.
Pro Tip: Wool dryer balls also reduce static, which means you can skip dryer sheets entirely. Dryer sheets contain waxy coatings that can accelerate print failure on screen-printed tees.
How do you soften a shirt without damaging the screen print?
Printed tees need a gentler approach. Turn garments inside out before washing and avoid high heat and harsh abrasion. These two steps alone dramatically reduce cracking and peeling on screen prints and heat transfers.
Dos and don’ts for printed tees:
- Do turn the shirt inside out before every wash and dry cycle.
- Do use cold or warm water, never hot.
- Do spot-test any solution on an inconspicuous area before a full treatment.
- Do prefer soak and rinse methods (vinegar, baking soda) over abrasive ones.
- Don’t use pumice or sandpaper anywhere near a printed zone.
- Don’t use dryer sheets if the print is sensitive. The waxy coating can soften adhesive bonds.
- Don’t apply fabric softener directly onto the printed surface.
Safe step-by-step for printed tees:
- Spot-test your chosen solution on an interior hem.
- Turn the shirt inside out.
- Run a vinegar rinse cycle or baking soda wash on cold or warm.
- Transfer to the dryer with 2–4 wool dryer balls on low heat.
- Remove while slightly damp and hang to air finish.
Fabric softener coatings and heavy abrasion can accelerate print failure. Use them sparingly and only when the print is well-cured and the shirt is not a limited-edition piece you want to preserve.
How long does softness last after treatment?
It depends entirely on the method. Some changes are structural and permanent. Others wear off after a few washes.
Expected lifespan by method:
- Vinegar rinse: Softness lasts several washes. Residue and mineral buildup return over time, so repeat every 4–6 wash cycles.
- Salt/brine soak: Often produces a more permanent structural change by physically relaxing fibers. Results tend to hold through repeated washing.
- Baking soda wash: Similar to vinegar, temporary to semi-permanent. Best used as a recurring maintenance step.
- Fabric softener: Temporary. The coating washes out within a few cycles, and buildup can make the fabric feel heavy if overused.
- Mechanical abrasion: Permanent. Fiber damage does not reverse. The vintage texture stays, but so does any fraying or thinning.
- Dryer ball tumbling: Cumulative. Regular use builds softness over time without chemical residue.
Maintenance tips to keep shirts soft long-term:
- Alternate vinegar rinses with your regular wash every 4–6 cycles.
- Tumble with dryer balls consistently rather than relying on softener.
- Avoid over-detergenting. Excess detergent leaves residue that stiffens fabric.
- Dry on low heat and remove while slightly damp every time.
Repeated washing and wearing is the slowest route, often taking 3–5 cycles before you notice a real change, but it’s the safest fallback for delicate prints or specialty finishes.
If you own an Elitebloodlines heavyweight tee, start here
Elitebloodlines builds its tees from thick, purposefully heavy cotton construction. That density is a feature, not a flaw. It means the fabric tolerates light mechanical softening well, but it also means aggressive methods carry more risk than they would on a thin band tee.
Recommended approach for Elitebloodlines heavyweight tees:
- First move: Vinegar rinse or low-heat dryer ball tumble. Both are gentle enough for printed designs and effective on the thick ring-spun cotton used in the core lineup.
- For older, unprinted pieces: A salt soak (24–48 hours) works well and produces lasting results without risking print adhesion.
- Avoid: Pumice or sandpaper near any graphic. The purposefully thick hems and seams on Elitebloodlines tees can fray under aggressive abrasion. Always test on the interior hem first.
- Blends and lighter pieces: Stick to cold-water vinegar rinses and air-fluff dryer cycles.
Check the heavyweight tee construction guide for fabric-specific care details. For persistent stiffness or questions about a specific piece, reach out to Elitebloodlines customer support directly through the brand site.
Pro Tip: The Elitebloodlines vintage gym wear line is built with a lived-in hand already dialed in. If you want that feel without the DIY work, it’s worth a look before you reach for the salt bucket.
The honest tradeoff between softening a shirt and keeping it alive
Here’s where most guides go quiet: mechanical distressing and aggressive soaking are not neutral acts. You’re trading garment lifespan for feel. On a thin vintage band tee, a single pumice session can take a shirt from wearable to unwearable in ten minutes. On a heavyweight streetwear tee built to last, the math is different. The thick construction absorbs more abuse before it shows.
My preference for heavyweight streetwear is the salt soak followed by regular dryer ball tumbling. It produces a genuine broken-in feel without the irreversibility of abrasion. For thin tees or anything with a print I care about, the vinegar rinse is the only tool I trust. The vintage look is earned over time, not forced in an afternoon. A shirt that looks distressed because it’s been lived in hits differently than one that looks distressed because someone attacked it with sandpaper. Know which one you’re going for before you start.
*— Michael
Tees that arrive soft: the Elitebloodlines alternative
DIY softening works. But it takes time, carries risk, and some results are permanent in ways you can’t undo. If you want heavyweight cotton with a vintage, broken-in hand from the first wear, Elitebloodlines has already done that work for you.

The EB Vintage Line delivers pre-softened, vintage-washed heavyweight tees built for people who want the lived-in feel without the salt bucket. The construction is thick enough to hold its shape through years of wear, and the wash treatment means you’re not starting stiff. For those who prefer a printed heavyweight tee with the same soft hand, the EB Core Line Oversized Heavyweight Tee is a direct answer. If you prefer the DIY route and want to distress your own piece, that’s a legitimate choice. Just know that mechanical distressing is irreversible, and some shirts are worth preserving. Browse the current lineup and find the drop that fits your build.
Sources
- How to Make Your T‑Shirts Feel Vintage‑Soft — One Good Thing by Jillee
- How to Soften Cotton T Shirts: From Stiff to Super Soft — Manufacturing Clothes
- Five Simple Ways to Make Stiff Clothes Soft Again — Clean’n’Press
Recommended
- How to Choose Heavyweight T Shirts That Hit Hard – Elite Bloodlines Apparel
- Best Oversized Gym Shirts for Built-Not-Bought Style – Elite Bloodlines Apparel
- Best Pumping Iron T-Shirts to Buy in 2026 – Elite Bloodlines Apparel
- Men’s Oversized Streetwear Tees That Earn Respect – Elite Bloodlines Apparel