

Under 2 Minutes: How Brands Measure Heavyweight T Shirt Size
Measure a t-shirt laid flat, not on your body. Pit-to-pit gives you the chest number, and high-point-shoulder to hem gives you the length. Those two measurements are what almost every online size chart is built on. Grab a benchmark tee you already love the fit of, lay it flat, and start with those two numbers before you compare anything else.
TL;DR:
- Measure chest width at the armpit seam and length from the high point shoulder to the hem for the most accurate t-shirt fit.
- Use flat measurements on a smooth, unstretched shirt laid on a hard surface, and record each measurement twice to ensure accuracy.
- When comparing to size charts, double your flat measurements to get circumference or halve your body measurements; never mismatch these two.
- Heavier heavyweight tees maintain structure, so their fit may differ from standard cotton, with shoulder seams dropping and sizes appearing larger.
- Consistently use a trusted benchmark tee as your reference, and compare its measurements to each brand’s specific chart rather than relying on the size label alone.
Table of Contents
- How Do You Measure T-Shirt Size Correctly?
- The Flat-Lay Method: Chest, Length, Shoulder, and Sleeve
- How to Measure Your Body and Match It to the Shirt
- Reading Size Charts and Product Pages Without Getting Burned
- Common Measuring Mistakes and How to Avoid Them
- Fit Notes for Heavyweight Streetwear Tees
- How to Measure T-Shirts for Kids Versus Adults
- Why the Same Size Label Fits Differently Across Brands
- What Actually Matters When You Measure a T-Shirt
- Check Your Numbers Against Elite Bloodlines Fit Pages
- Sources
How Do You Measure T-Shirt Size Correctly?
Before you pull out a tape measure, set yourself up to get numbers you can trust the first time. Sloppy prep is the reason most people measure a shirt twice and get two different answers.
Here’s what you need on hand:
- A soft measuring tape (fabric or vinyl, not a rigid carpenter’s tape)
- A rigid, flat surface: a table, countertop, or hard floor works better than a bed or couch
- Your phone or a notepad to log every number as you go, not from memory later
- A shirt you already know fits the way you want, used as your benchmark
- Optional backup: a piece of string and a ruler, if a tape measure isn’t handy
Pick the benchmark tee carefully. Don’t grab something straight out of the dryer, still wrinkled, or stretched out from years of wear. A shirt with warped seams gives you warped numbers no matter how careful you are with the tape. If you’re shopping for someone else, or sizing for a group order, having two benchmark shirts (one slim, one relaxed) saves a lot of guessing later, and you can find practical guidance on unisex sizing and sampling for group orders at Shay’s Print Shop.
The Flat-Lay Method: Chest, Length, Shoulder, and Sleeve
This is the core skill. Once you can do this on any shirt in under two minutes, you’ll never have to guess your size on a product page again.
Start by laying the shirt face up on your flat surface. Smooth out the fabric with your hands, but don’t pull or stretch it. You want the shirt resting the way it naturally sits, not stretched taut like a drumhead. Button any buttons and zip any zippers so the shirt lies at its true width.
- Chest (pit-to-pit). Measure straight across the shirt, 1 inch below the armpit seam. This is the industry standard for chest width, and it’s the single most important number on the shirt. Multiply by two if you want total chest circumference, since you’re only measuring one side.
- Length. Start at the high point shoulder, or HPS, which is where the collar seam meets the shoulder seam. Run the tape straight down to the bottom hem. This is the standard location brands use for shirt length, and it’s why two shirts with the same “size” label can hit your body at completely different points.
- Shoulder. Measure seam to seam across the back of the shirt, from where one shoulder seam ends to where the other begins.
- Sleeve. For short sleeves, measure from the shoulder seam down to the sleeve hem. For long sleeves, you’ll often need to combine that number with half the shoulder width to get an accurate total reach.
- Hem width (optional). Measure straight across the bottom of the shirt. If it’s noticeably narrower than the chest measurement, the shirt has a tapered cut, which matters if you don’t like a fitted waist.
Chest is the priority. Everything else refines the fit, but chest determines whether the shirt works across your torso at all, and it’s the number most likely to make or break the fit.
Pro Tip: Take every measurement twice before you record it. A tape that’s slightly angled or a shirt that shifted mid-measurement can throw a number off by half an inch, which is often the difference between two adjacent sizes.
How to Measure Your Body and Match It to the Shirt
Your body measurement and the shirt’s flat measurement are two different things, and mixing them up is where most sizing mistakes happen.
To measure your own chest, wrap the tape around the fullest part of your chest, keep it level front to back, and breathe normally. The tape should sit snug but not tight, with enough room to slide two fingers underneath. This gives you a circumference number, in inches, around your entire chest.
Here’s where people get tripped up: most brand size charts list flat measurements, meaning one side of the garment, not a full circumference. So you have two options:
- Double your flat shirt measurement before comparing it to a body-circumference chart
- Or divide your body circumference in half before comparing it to a flat garment measurement
Match flat-to-flat or circumference-to-circumference. Never compare a raw flat number to a raw circumference number, since that mismatch alone can push you a full size off.
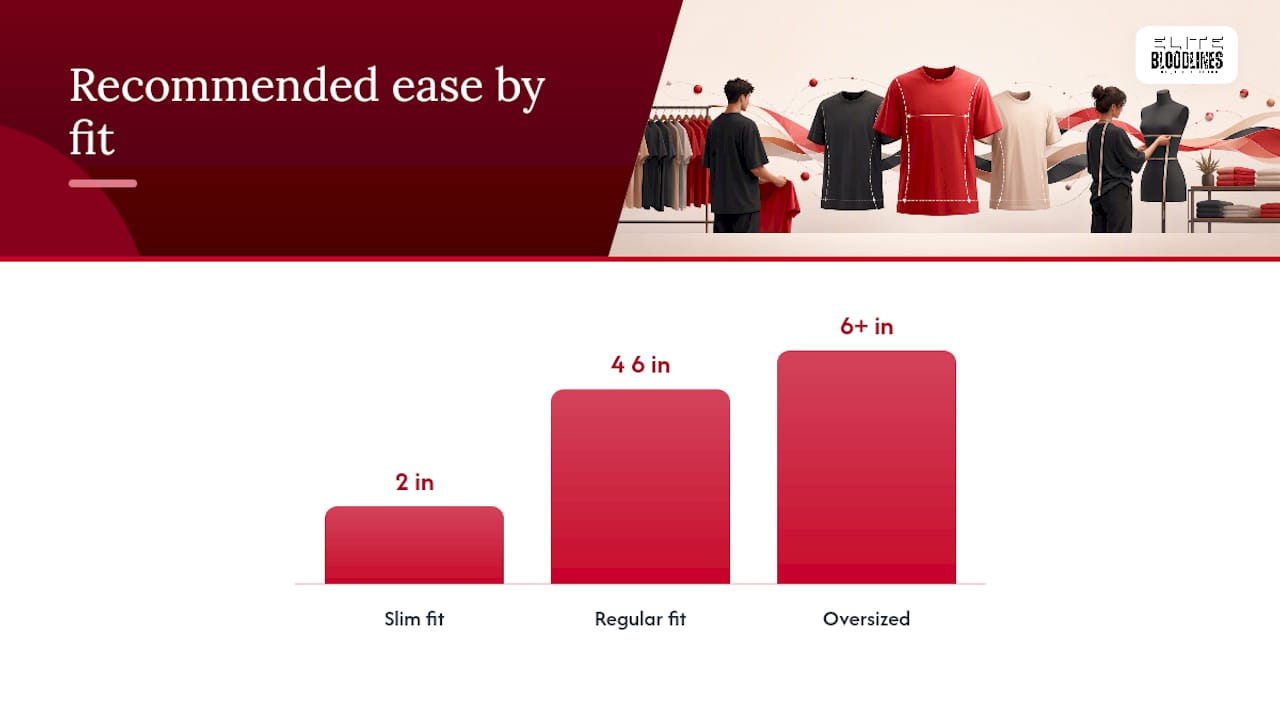
Add ease on top of your body number depending on the fit you want: roughly 2 inches for a slim fit, 4 to 6 inches for a regular fit, and 6 inches or more for an oversized, streetwear-style cut. Heavyweight cotton also tends to shrink slightly after the first wash, so if you’re between sizes, sizing up and prioritizing chest and shoulder alignment over a perfect length match is usually the safer call.
Reading Size Charts and Product Pages Without Getting Burned
Once you have your numbers, the real test is using them on an actual product page, where charts are often incomplete or formatted differently than you’d expect.
Lead with chest every time you compare your numbers to a chart. Length and shoulder width matter, but they’re secondary. A shirt with the right chest but a slightly off length is a minor styling choice. A shirt with the wrong chest is a return.
- If a chart only lists chest measurements, that’s usually enough to make the call.
- Check whether the chart lists flat or circumference numbers. It’s rarely labeled clearly, so if the chest number looks unusually small, it’s probably flat.
- Read the product notes for fabric weight and cut style. An oversized cotton tee and a classic-fit blend will wear the same “size Large” completely differently.
- Skim a few reviews for mentions of runs small, runs large, or shrinks after washing. That’s often more current than the chart itself.
- Keep your benchmark tee’s numbers saved somewhere you can pull up fast while shopping.
The most reliable workflow is a repeatable one: benchmark tee, flat measurements, direct comparison to the chart, every single time you shop a new brand.
Common Measuring Mistakes and How to Avoid Them
A few habits separate a clean, repeatable measurement from a frustrating guessing game. Most of these mistakes come from rushing.
- Don’t wrap the tape around the shirt like you would around your body. Flat charts need flat measurements, not circumference.
- Don’t measure on a bed, couch, or anything soft. Fabric sags on soft surfaces and gives you an inflated number.
- Don’t stretch the shirt while smoothing out wrinkles. You’re flattening creases, not pulling the fabric taut.
- Always measure twice and write down the shirt name alongside the numbers, especially if you’re comparing several shirts at once.
- Keep two benchmark tees on hand, one slim-fitting and one relaxed, so you’re never forcing one shirt to represent every fit you own.
For rounding, pick a rule and stick to it: round up to the nearest half-inch rather than down. Since brand ease varies so much between manufacturers, rounding up gives you a small buffer instead of a shirt that runs tight.
Pro Tip: If your chest measurement lands right between two sizes on a chart, check the shoulder measurement next. A shoulder seam that’s too narrow will pull and pucker no matter how roomy the chest is, so let the shoulder be your tiebreaker.
Fit Notes for Heavyweight Streetwear Tees
Heavyweight tees don’t wear like a basic cotton blend. Heavier fabric holds its shape, which usually means a more structured shoulder seam and a visible shoulder drop, the point where the seam sits past your natural shoulder line rather than right on it.
That structure changes what your flat measurements actually mean on your body. A classic fit will track close to your body measurements with modest ease. An oversized fit intentionally runs wider at the chest and drops the shoulder seam further down the arm, so don’t be alarmed if the shoulder number looks larger than you’d expect for your usual size. That’s the design working as intended, not a chart error. If you’re deciding between the two, comparing your benchmark tee’s shoulder and chest numbers against a classic versus oversized breakdown makes the tradeoff a lot clearer than guessing from a size label alone.
How to Measure T-Shirts for Kids Versus Adults
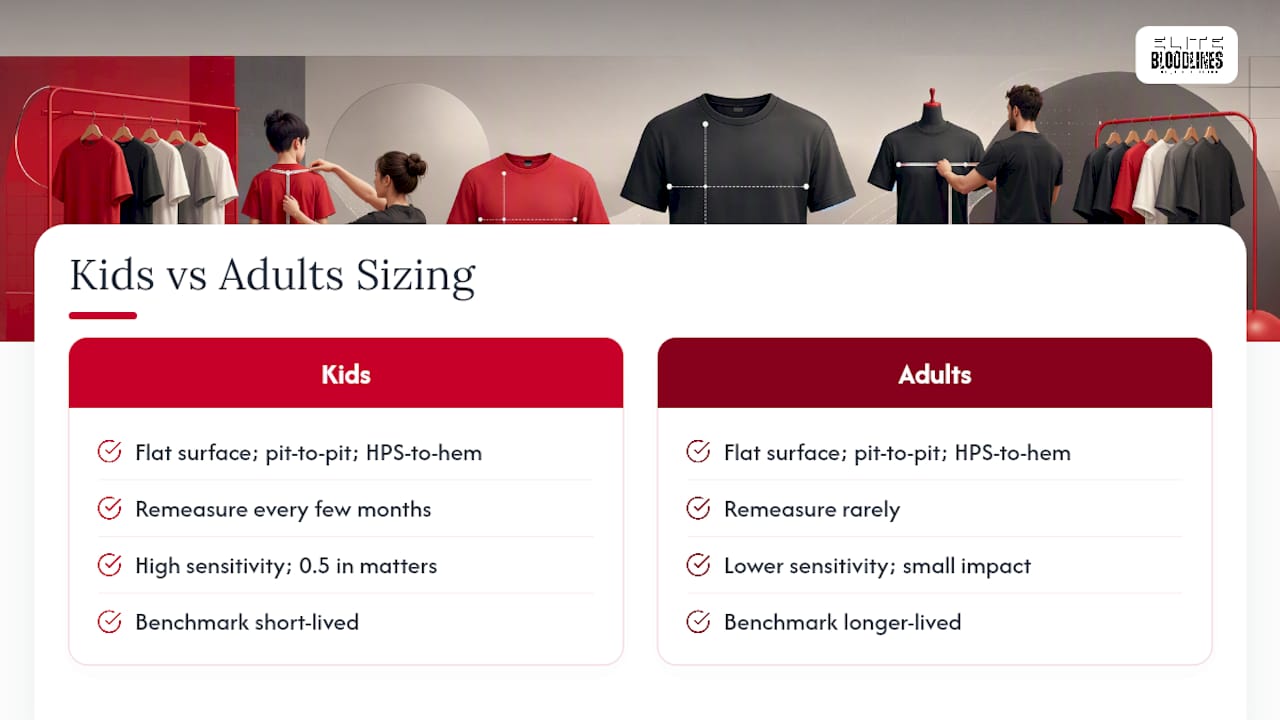
The method stays the same. Flat surface, pit-to-pit chest, HPS-to-hem length. What changes is the tolerance for error and how often you need to remeasure.
Kids’ sizing swings fast. A child can move up a full size in a matter of months, so a benchmark tee that fit perfectly last season is a weak reference point now. Measure a current, well-fitting shirt rather than relying on a size label from a few months back, and expect to redo this every few months for actively growing kids.
Youth charts also compress the size range more tightly than adult charts. A half-inch difference that barely matters on an adult Large-versus-Extra-Large decision can be the entire gap between a youth Small and a youth Medium. Round up to the nearest half-inch here just like you would for adults, but hold the numbers with a little less confidence. Recheck the fit after the first wash, since kids’ clothing tends to see more frequent laundering and heavier wear.
For adults, your benchmark tee stays valid far longer, since adult body measurements shift far more slowly. The bigger variable for adults isn’t growth, it’s brand-to-brand inconsistency, which is exactly why a saved set of benchmark numbers matters more the more brands you shop across.
Why the Same Size Label Fits Differently Across Brands
A size Large from one brand and a size Large from another can differ by an inch or more at the chest. There’s no universal standard forcing brands to agree, so “Large” is really just each brand’s own internal shorthand for a specific set of flat measurements.
This is exactly why the flat-lay method matters more than memorizing a size label. Your size isn’t “Large.” Your size is a chest measurement, a length, and a shoulder width, in inches, that you can compare against any brand’s chart regardless of what letter they put on the tag.
When you shop a new brand, treat the size label as a suggestion and the chart as the actual instruction. If a brand runs its garments narrower in the chest but longer in the body, your usual size might fit through the shoulders and swim at the hem, or the reverse. Fabric weight plays into this too. A heavier GSM fabric drapes differently than a light blend, even at an identical chest measurement, because the structure holds its shape instead of clinging.
The fix is the same every time: pull up the brand’s flat measurements, compare chest first, then length and shoulder, and let those numbers make the call instead of the label on the tag.
What Actually Matters When You Measure a T-Shirt
Most sizing confusion doesn’t come from a lack of information. It comes from measuring the wrong thing, or measuring the right thing inconsistently. The chest number below the armpit and the length from HPS to hem carry almost all the useful signal. Everything past that is refinement.
The conventional advice to “just know your size” falls apart the moment you shop more than one brand, because your size isn’t a fixed number. It’s a comparison between your body or your benchmark tee and whatever chart that specific brand happens to publish. Treat every new brand as a fresh comparison, not an extension of what you already know.
If there’s one habit worth building, it’s the benchmark tee. Measure a shirt you already trust, write down the numbers, and use that as your reference point every time you shop instead of re-measuring your body from scratch. Consistency in method beats precision in any single measurement, since a repeatable process catches its own errors over time in a way that a single perfect measurement never can.
— Michael
Check Your Numbers Against Elite Bloodlines Fit Pages
Every product page in our collections lists flat chest, length, and shoulder measurements, so you’re comparing real numbers instead of guessing from a size label. If you run classic, the EB Heritage Collection V1 gives you a true-to-body cut with the shoulder seam sitting close to your natural line. If you want the streetwear drop, browse the EB Graphic Tees for the wider chest and extended shoulder that heavyweight oversized fits are built around.

Pull your benchmark tee’s pit-to-pit and HPS-to-hem numbers before you buy, and line them up against the measurements on the product page. If your numbers fall between two sizes, our true to size breakdown walks through which way to round for our cuts specifically. Ready to compare? Check the latest Current Drops and match your measurements before you check out.
Sources
- The comprehensive instruction on how to measure a t-shirt for the optimal fit — ManufacturingClothes
- How to measure a t-shirt — Merchize
- How to measure chest for shirt — TailorSizeGuide
- How to measure t-shirt size — Boring Label